1. Introduction to machine vision light sources
The core of the machine vision system is image acquisition (how to get a good picture) and image processing (how to find the most effective and accurate algorithm). All information comes from the image, and image quality is extremely critical to the entire vision system. At present, most of the software used for image processing in the vision industry are software packages provided by some image processing software companies, such as HALCON of MVTec of Germany, VisionPro of Cognex, NIVision of NI, etc. In the case of very small differences in processing software performance, how to obtain good pictures stably and continuously will directly determine the stability of the system. Ways to obtain better pictures: According to the characteristics of the workpiece and the on-site environment, accurate light source selection is carried out through lighting experiments to ensure the stability and continuity of the acquired pictures.
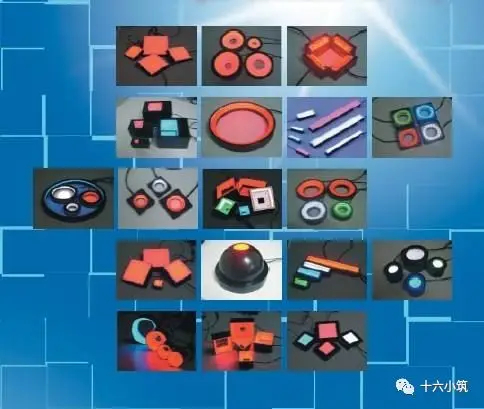
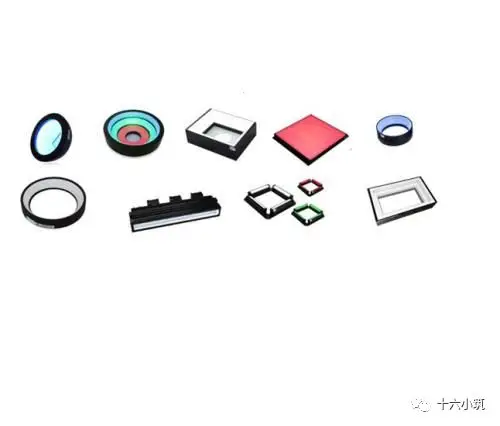
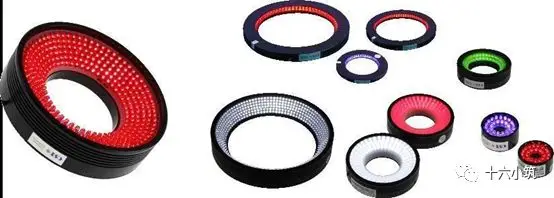
There are many types of light sources that can achieve lighting, but in machine vision, the most widely used are halogen lamps, fluorescent lamps and LED lamps. In recent years, LED technology has developed rapidly, and with its inherent characteristics, such as long life, stable brightness, different shapes and spectra, strobe and low power consumption, it has gradually become the dominant light source used in machine vision. Of course, in color detection, fluorescent lamps are still widely used due to their good color reproduction. In high-brightness applications, halogen lamps have their own advantages.
2. The role of light source in machine vision
The light source in the machine vision system mainly plays the following roles:
1. Illuminate objects and increase brightness;
2. Create an effect that is beneficial to image processing;
3. Overcome ambient light interference and ensure image stability;
4. Used as a measuring tool or reference.
The lighting system is one of the most critical parts of the machine vision system. It is directly related to the success or failure of the system. Its importance cannot be overemphasized. Good lighting design can enable us to obtain a good picture, thereby improving the resolution of the entire system and simplifying the software operation. Inappropriate lighting will cause many problems.
Through proper light source lighting design, the target information and background information in the image can be optimally separated, which greatly reduces the difficulty of image processing algorithms and improves the accuracy and reliability of the system. Up to now, there is no universal machine vision lighting device, so for each specific case, it is necessary to design a suitable lighting device to achieve the best effect.
The core of the machine vision system is image acquisition and processing. All information comes from the image, and the quality of the image itself is extremely critical to the entire vision system. The light source is an important factor affecting the image level of the machine vision system, because it directly affects the quality of the input data and at least 30% of the application effect. The light source also directly affects the contrast of the image, so the light source plays a key role in the entire machine vision system.
A good image should have the following conditions:
1. The contrast is obvious, and the boundary between the target and the background is clear;
2. The background should be as light and uniform as possible so as not to interfere with image processing;
3. Regarding color, the colors must be true, the brightness must be moderate, and there must not be overexposure.
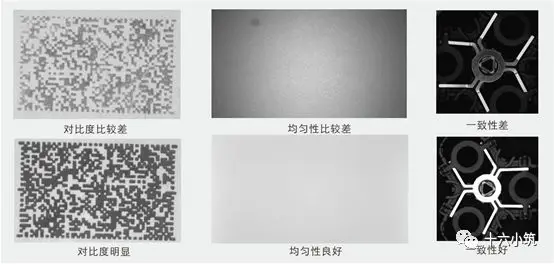
As shown in the figure above, the three pictures in the upper row are examples of poor image effects. Poor contrast will make it difficult to separate the target from the background, poor uniformity will make it difficult to find a global grayscale discrimination standard, and poor consistency will lead to incomplete target extraction. The three pictures in the lower row are examples of situations with better contrast, uniformity, and consistency. With such effects, image processing and information extraction will be very simple and stable.
The importance of lighting in machine vision has been recognized by almost all vision engineers. We often see such mottos as "better to light than write (software)", "avoid garbage in (bad lighting) that causes garbage out (bad result)", "create the BEST image first", "Lighting can make or break the job", etc. The next question is how we choose the light source, design the lighting system, and ultimately obtain the best image effect.
When designing a lighting system, we should first understand the characteristics of the light source. This includes: (1) the characteristics of the light source itself, such as the spectral distribution of the light source, the brightness distribution on the illuminated surface, the temperature characteristics and life of the light source during use, etc. (2) the interaction between the light source and the illuminated object. When a light source shines on an object, three interactions occur: reflection, absorption and transmission. Objects of different materials will produce different phenomena from the three interactions. The three interactions also produce different phenomena for defective parts and other parts of the same object. For example, in surface inspection, we can roughly divide the defects on the target into two categories: one is geometric shape defects, such as pits, scratches, cracks, burrs, protrusions, abrasions, bumps, etc.; the other is surface intensity (or density) defects, such as oxidation, rust, stains, and stains. The former changes the surface reflection, while the latter changes both the surface reflection and absorption. Only by carefully studying the characteristics of the interaction between the light source and the illuminated object can we determine the light source and lighting method. The color of an object is another example of light absorption. When full-band white light is irradiated onto the surface of an object, some wavelengths of light are absorbed by the surface of the object, and some wavelengths of light are reflected by the surface, and the object presents the same spectrum color as the reflected light. Using this principle, we can use a black and white camera, select a light source of a specific wavelength, highlight the grayscale difference between the part to be detected and other parts of the surface of the object, and achieve reliable and stable detection. (3) The structure of the light source. The light source can be made into various shapes and structures, and each shape has different characteristics of light emission. For example, diffuse light can obtain uniform illumination on the target plane; direct light can display edges and surface structures through reflection and shadow generation, but the movement and tilt of the light source or target will significantly affect the image brightness and contrast. In addition, the light source can be placed above or below the illuminated object, and can have various angles and heights. Through the combination of different shapes and lighting methods, using methods such as generating shadows, generating highlight areas or non-reflective areas, the area of interest on the target can be as different as possible from other areas.
After determining the light source and lighting method, the last and most important step in designing a lighting system is experimentation. In the real world, the surface characteristics of a target are not singular, and the interaction between the light source and the target object is often a combination of various phenomena, some of which are difficult to accurately describe with theory. The correctness of the design can be verified through experiments. At the same time, in the experiment, changing the factors that affect the image, such as the position of the target in the field of view and its angle relative to the light source, the brightness of the light source, etc., can further verify the reliability and stability of the system.
In short, the ultimate goal of designing a light source system is to maximize the contrast of features of interest, suppress and reduce the influence of other parts of the target, and suppress the influence of the external environment.
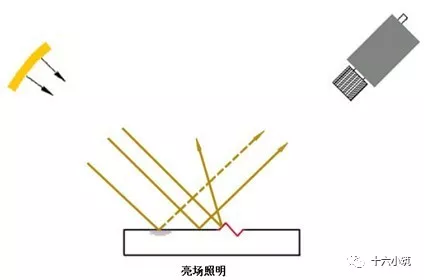
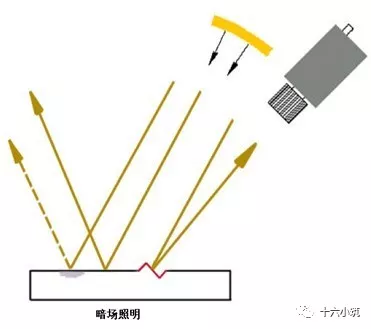
Bright field and dark field illumination
Bright field lighting and dark field lighting describe the relative position of the light source and the camera, and are common terms in machine vision lighting technology.
When the camera is perpendicular to the object being detected, the definitions of bright field illumination and dark field illumination are:
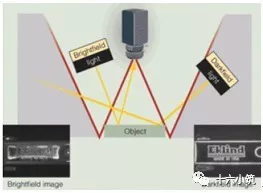
Assuming that the detection target has a flat and smooth surface (mirror), the camera is placed above the center of the target. As can be seen from the figure, the light emitted within the two "V"s of "W" is reflected by the target surface and all falls within the range of the lens, which is called bright field illumination; while the light emitted outside the two "V"s of "W" is reflected by the target surface and no light falls within the range of the lens, which is called dark field illumination.
When there are defects on the target surface, such as: etc., with bright field lighting, the reflected light from the defective part no longer falls into the range of the lens, forming a low gray value area, which contrasts with the background; dark field lighting is just the opposite, the reflected light from the defective part enters the lens, producing a high gray value area.
The concepts of bright field lighting and dark field lighting can also be extended to situations where the camera is not perpendicular to the target surface, as shown in the figure:
Front and back lighting
Front lighting and back lighting describe the relative positions of the camera, light source and the object being inspected. As the name implies, front lighting means that the camera and light source are on the same side of the object being inspected; back lighting means that the camera and light source are on each side of the object being inspected.
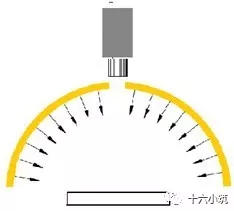
Front lighting can be achieved in various ways, but we can use a hemispherical light source on the target to be detected to represent it uniformly. As shown in the figure:
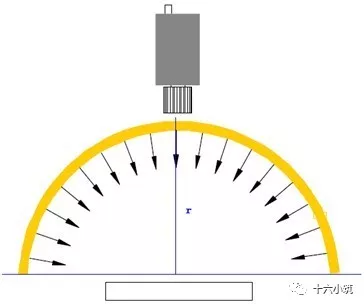
The light source (illuminant) can be the entire hemisphere; it can be a ring with a radius of r on the hemisphere or a part of the ring, and the position of the ring can be anywhere on the sphere; the light source can also be distributed on one side of the camera. The most common front lighting methods are:
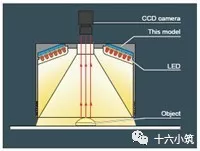
Top Light
Top lighting is bright field lighting, and the light source can be direct light or diffuse light.
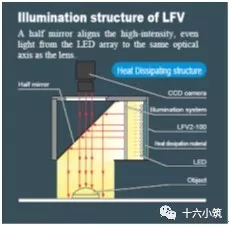
Coaxial light
Coaxial light belongs to bright field illumination. Ideally, the light irradiated to the surface of the target object is parallel to the main optical axis of the lens. Coaxial light is suitable for the detection of defects such as tiny pits, scratches, cracks, burrs, and protrusions on smooth metal surfaces, or the detection of target objects whose surfaces are composed of materials with different reflection and absorption characteristics. Coaxial light is composed of semi-transparent and semi-reflective mirrors, and the actual efficiency is only 25%.
Dome
The light is emitted from all angles of the luminous hemisphere, so Dome is a light source with a very uniform light field, producing a shadowless image. The left picture is the principle diagram of Dome, and the right picture is the principle diagram of the actual light source structure. It is suitable for printing or text detection on uneven smooth surfaces.
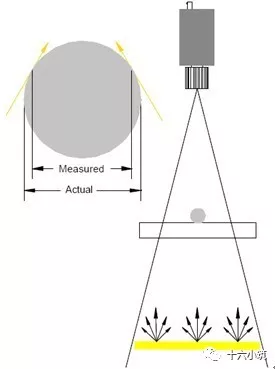
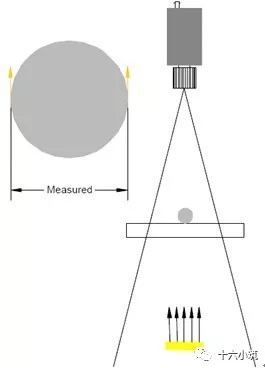
Backlighting
When measuring the target size using backlight illumination, if the edge of the target is a curved surface, the measurement result will be smaller than the actual size. To avoid this phenomenon, a collimated light source should be used, such as coaxial light or parallel light as the backlight source, and a telecentric lens should be used.